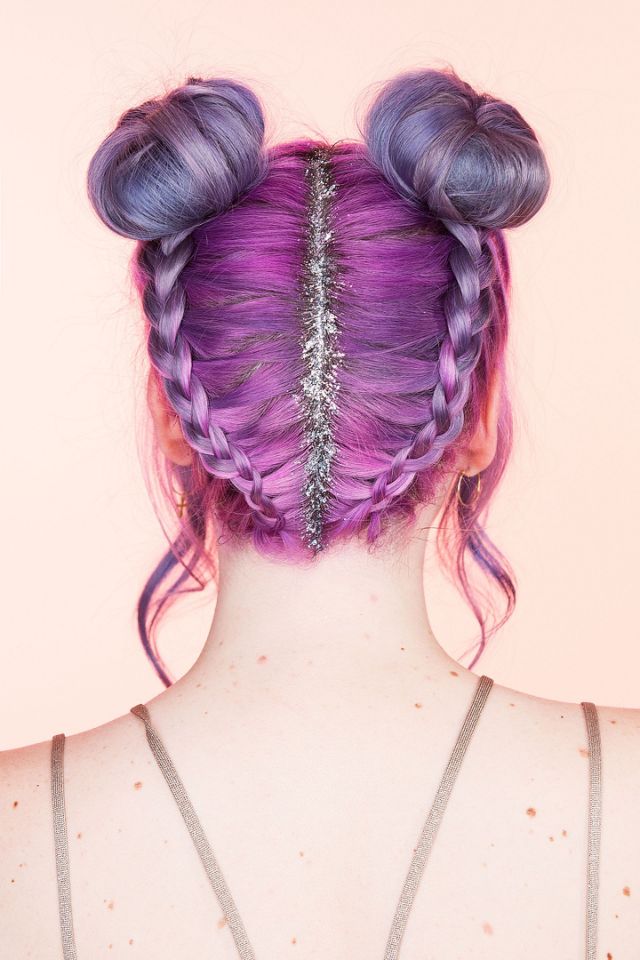
Summer Festival Braid How-To!

Braided Space Bun
1. Apply beachwaver braid balm from roots to ends, & then Split your hair in half. Separate your hair into two sections right down the middle. Clip one of the sections back to keep it out of the way while you work on the other section.
2. Start your reverse French braid from the bottom. Start with a small section at the base of your neck and split it into three parts. Begin an inside-out French braid (instead of braiding the hair sections toward you, braid them away from you to create the reverse effect).
3. Continue to braid to the crown of your head. Once you've reached the crown, use a small clear elastic to tie off the braid into a ponytail.
4. Repeat steps 2 and 3 on the other side.
5. Tease your ponies. Hold the end of one ponytail up with one hand and with the other hand, begin teasing the hair. Sarah says the correct way to tease so you don't damage the hair is to stick the bristles of a paddle brush into the pony and gently push the hair down toward the roots. Then remove the brush from the hair and start from the top again. Repeat this until you achieve the desired teased effect.
6. Make your buns. Use a Beachwaver wrap-up and roll your hair into a bun. Bend it into the shape you want to secure it.
7. Glitterfy your part. Using a glitter hair gel and a makeup brush, paint the glitter along your part.
Fishtail Into 5-Strand Hy-Braid
1. Apply beachwaver braid balm from roots to ends, & then Split your hair in half. Separate your hair into two sections right down the middle. Clip one of the sections back to keep it out of the way while you work on the other section.
2. Begin a fishtail French braid. Start at the top of your head and grab two small sections of hair. Begin fishtail braiding by taking a tiny piece of hair from one side and transferring it to the other side. But just like in the tutorial before, instead of braiding the sections toward you, braid the sections away from you to create the reverse effect. To turn your regular fishtail into a French fishtail, remember to incorporate a small piece of hair from the scalp when adding to the section on the other side.
3. Tie off the braid at the base of your neck. Use a small clear elastic to secure the braid right at the nape of your neck. Wrap a tiny section of hair around the elastic to hide it and secure it with a bobby pin.
4. Repeat steps 2 and 3 on the other side.
5. Begin your five-strand braid. Separate one of the ponies into five equal sections and number them 1–5 from left to right. Sarah says the "braid mantra" to remember so you don't mess up is "over, under, over, under." Starting on the left side, take section no. 1, cross it over no. 2, and then under no. 3. Next, working right to left, pass no. 5 over no. 4, and then under no. 3. For the next row, renumber the strands nos. 1–5 from left to right. Then take section no. 1, and cross it over no. 2 and under no. 3, and take section no. 5 and cross it over no. 4 and under no. 3. Repeat the process, row by row, until you've reached the end.
6. Secure the braid. Use another clear elastic to tie off the braid.
7. Repeat steps 5 and 6 on the other side.
8. Pancake your braid. Gently tug on sections of the braid to loosen it. This step is optional, but will make your braid look fuller and thicker.
Photo Credit: Ruben Chamorro
Model: Kirsten Stuke
Sarah Potempa


